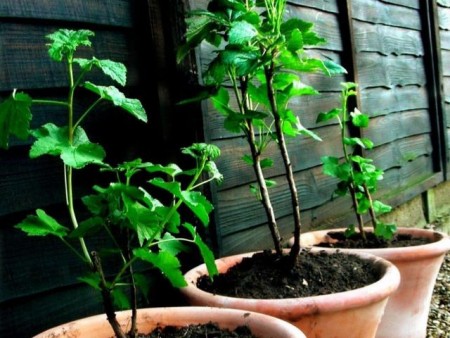
Currants reproduce quite easily. The main method of obtaining planting material is vegetative propagation, that is, growing seedlings using cuttings, layering and dividing the bush. Seed propagation of currants is not used in amateur gardening.
Biological basis of vegetative propagation
Vegetative propagation of currants is the ability to develop a new specimen from individual plant organs (shoots, cuttings, layering, etc.), but not from seeds.
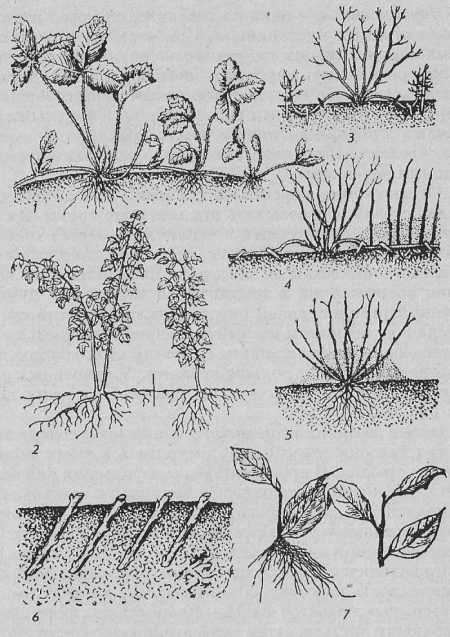
All these methods can be used to propagate currants.
Growing currant planting material by layering and cuttings is based on the fact that any bud, under favorable conditions, is capable of regenerating missing tissues, including roots.
The survival rate of cuttings varies among different currant varieties. Black currant varieties such as Orlovskaya Serenada, Sozvezdie, Sladkoplodnaya, Selechenskaya and Selechenskaya 2 have a high percentage of cuttings rooting. Varieties that take root are difficult: Dachnitsa, Dobrynya, Izyumnaya. The survival rate of red and white currant cuttings is 75-85%.
Only this year's shoots and last year's young growth, which has brown bark, are suitable for cuttings.
Old shoots with gray bark are not suitable for propagation. In addition, planting material obtained from old bushes takes root much weaker. The optimal age of currants suitable for propagation by layering and cuttings is 3-7 years. Further, the quality of the cuttings steadily decreases.
The survival rate of lignified cuttings is significantly higher than that of green ones. This is due to differences in metabolism in different types of shoots.
Planting material taken from young bushes forms adventitious roots faster than that taken from old ones. This is due to the fact that the vital processes of young plants proceed faster, young growth grows on them much better, and its supply of nutrients is higher than the same growth on old bushes.
Rooting also depends on which part of the bush the shoots are taken from.Material from the upper and middle parts produces roots faster than material taken from the lower branches of a currant bush. Cuttings taken from the growth of lateral shoots root better than those obtained from stems with zero branching. Cuttings from root shoots take root very weakly.
Basic methods of vegetative propagation of currants
The main methods of propagation include: cuttings, propagation by layering and dividing the bush.

Cuttings - the most common method of propagating currants. The method allows you to obtain a large number of seedlings in a short time. Black currants propagate by cuttings much better than red and white ones. There are 3 types of cuttings.
- Lignified cuttings. This is the most effective way to propagate currants. The rooting rate of cuttings is very high: depending on the type and variety of currant, it ranges from 75 to 97%. In a fairly short period, you can grow a large number of seedlings. There are 2 varieties of this method:
- lignified cuttings of this year. Held in early autumn or winter;
- woody cuttings from last year. Planting material is cut in the spring, or cuttings from the current year are prepared in advance and stored until spring.
- Green cuttings. This method is less popular. Rooting rate is 50-80%. For rooting, a humidity level of at least 90% is required. If the microclimate does not meet these requirements, the rooting rate of green cuttings is sharply reduced, up to its complete absence. This is a more complex rooting method and is suitable for those who have enough time and can create the necessary conditions.
- Etiolation of the shoot. This method is used extremely rarely for currant propagation.It is labor-intensive and requires a lot of experience and good knowledge of currant biology. The method is only suitable for experienced gardeners. Its essence is to darken part of the growing stem, as a result of which roots form without access to light. Subsequently, such a shoot with aerial roots is separated from the mother bush, divided into cuttings and immediately planted in a permanent place.
Reproduction by layering. The method is quite simple, but much less planting material is formed than with cuttings. The rooting rate of layering is 95-100%. The method has 3 varieties.
- Horizontal layers. Well suited for propagating red and white currants. Less suitable for producing blackcurrant seedlings.
- Arc-shaped layers. Suitable for white and red currants. It is practically not used for propagation of black-fruited varieties.
- Vertical layers. It is used when it is necessary to preserve a bush (or variety), and other methods of obtaining seedlings are impossible.
Red and white currants reproduce by layering better than black currants. The seedlings obtained in this way are stronger and more powerful than bushes grown from cuttings.
Dividing the bush. Used only in emergency cases. The method does not allow obtaining a large number of young seedlings. The bushes turn out to be weaker, suffer for a long time, and begin to bear fruit late. They are more susceptible to pests and diseases. Often seedlings obtained in this way die. A bush divided unless absolutely necessary is the surest way to destroy currants. The method is suitable only when it is necessary to transfer a valuable variety to another place.
Propagation of currants in spring
In the spring, currants are propagated by layering, woody cuttings from last year and by etiolation.
Reproduction by layering
Currants are usually propagated by horizontal and arched layering. The method is mainly used for red and white currants. Black currants are propagated by layering quite rarely, although their survival rate is higher than that of cuttings.
Only young 1-3 year old, non-coarse branches are suitable for such propagation. The technology for obtaining layering is similar in both methods.
Obtaining horizontal layering. For rooting in the spring, even before the buds open, several young strong branches are selected from the lower part of the bush, an incision is made in the bark of every second bud and they are bent to the ground.
In this way horizontal layers are obtained.
To obtain horizontal layering, make a groove in the ground, place a branch in it, securing it with wire, and cover it with earth. The soil is moistened abundantly. The upper end of the shoot remains above the ground. Blooming leaves are not removed, the shoot is not cut. New shoots form from buds sprinkled with soil. They are regularly watered and hilled. In the fall, the rooted cuttings are unplanted, separated from the mother bush and from each other, and planted in a permanent place. Flowering of such bushes begins next year.
Arc-shaped layers. The method is more suitable for white and red currants, since their branches are more flexible than those of black currants. In the spring, they select a 2-3 year old branch growing on the periphery of the bush, bend it in an arched manner to the ground, securing it with wire and covering it with earth. The upper and lower ends remain free. On the part that will be covered with earth, first make an incision in the bark, inserting a chip into it. The soil is kept moist all summer. The shoot is not pruned, giving it the opportunity to grow freely.In the autumn or spring of next year, the rooted cuttings are planted in a permanent place. The young bush blooms in the same year.
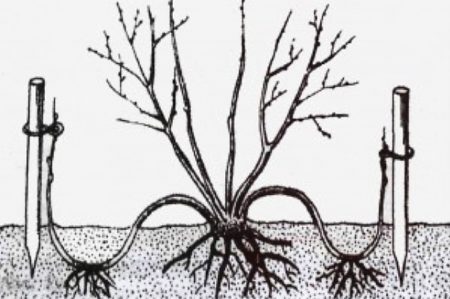
Arc-shaped layers.
The method is very simple, it allows you to get strong seedlings with a developed root system. If you do not need to obtain planting material in large quantities, then this method is the most reliable and convenient.
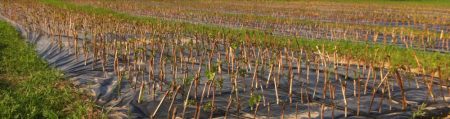
Rooting lignified cuttings
Material for cuttings is taken when the bushes begin to grow (in the middle zone, late April-early May). Lignified shoots from last year are taken from the top or middle part of the bush, all the leaves are wiped off, and the shoots are cut. The stalk should have 4-6 buds, and be as long and thick as a pencil. Shoots that are too thin or already roughened are unsuitable for propagation, since they take root very difficult. The upper cut should be straight, made above the kidney, the lower cut - obliquely under the kidney, without touching it. The top of the stem is cut off; it is unsuitable for propagation. Immediately after cutting, the planting material is soaked for 16-20 hours in an auxin solution for better rooting (Heteroauxin or Kornevin preparations) and planted.
No special conditions are required for rooting lignified cuttings. The place should be level, free from weeds, protected from winds and direct sunlight. Planting material is planted at an angle of 45°, covering the 3 lower buds with soil. The lowest bud located on the surface should be at ground level. If there are a lot of cuttings, then they are planted at a distance of 8-10 cm from each other, the row spacing is 50-60 cm. After planting, the soil is compacted; there should be no voids, otherwise rooting will not occur. The soil is well watered and mulched with peat or sawdust. The planted cuttings are covered with a cap made of plastic bottles or film.When the leaves appear, the cap is removed; their appearance indicates the rooting of the shoot.

Rooting woody currant cuttings.
Further care consists of regular watering. By autumn, the seedlings will have grown significantly and become stronger. They are left in the same place for another year, and in the fall of next year they are planted in a permanent place.
Etiolation of currant shoots
The method is used very rarely. Basically, they resort to it when the bush is quite old, the growth is insignificant and pruning does not give the desired results.
In mid-May, a fairly powerful, healthy 2-3-year-old shoot is selected and a black film is put on the lower internode (the first 2 buds), securing it on both sides with wire, rubber band or tape. The shoot is not separated from the bush or cut. The upper and lower buds should be under the film. Both leaves at the internode are removed. The rest of the shoot remains free and grows as usual, the leaves are not torn off from it. When it grows by 5-7 buds, moving 3-4 buds away from the upper edge of the film, you can apply a second film sleeve. As the stem grows, sleeves are applied every 5-6 buds. Etiolated branches grow well, but usually do not bloom. In the dark, under the film of buds, root rudiments form. When they appear on all etiolated areas of the stem, it is cut off. Cut the cuttings so that the bottom cut is below the edge of the film, and the cutting itself contains 4-5 buds. The film sleeves are removed from the cuttings and planted obliquely, deepening them to 6-8 cm. Only 1-2 buds remain above the surface, on which a film cap is placed. Further care for etiolated planting material is the same as for lignified cuttings.
Summer propagation of currants
In summer, currants are propagated by green cuttings.
Propagation by green (summer) cuttings
This is a more labor-intensive method that requires a significant investment of time and effort. However, it allows you to obtain seedlings of varieties that are difficult to propagate by other means. To propagate currants using this method, you must have free space in the greenhouse or greenhouse where the planting material will be planted. Green cuttings require very high air humidity and constant temperature for rooting - this is the key to successful rooting. In addition, at first the planting material should be heavily shaded.
The ground under the cuttings needs to be dug up, compost or humus added, and ordinary garden soil mixed with washed river sand or regular sand in a layer of 10-12 cm poured on top. After 2-3 days, green cuttings can be planted in this substrate.
Summer propagation of currants by green cuttings.
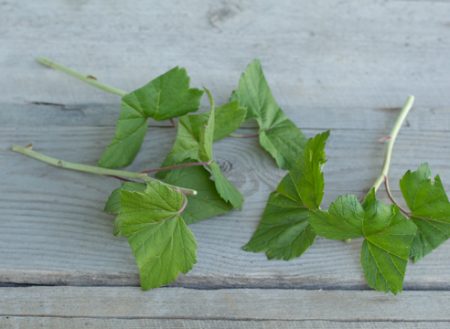
Planting material is obtained in the second half of summer after harvest (late July-early August). They take it from the current year's growth. Young green shoots are cut into cuttings 5-10 cm long (3-4 internodes), the top of the stem is discarded because it is herbaceous and unsuitable for planting. The upper cut is made straight, the lower one at an angle of 25-30° under the bud. The closer to the bud the cut is made, the more substances that cause root formation (auxins) will flow in. After cutting, it is advisable to lubricate the upper cut with garden pitch, plasticine, or chewing gum, at worst, so that it does not dry out. Cuttings that are too long are unsuitable for propagation; they will dry out without producing roots. 3-5 buds on a green cutting are quite enough for its normal development.
Planting material is prepared early in the morning, when the currant branches have maximum turgor, immersed in a solution of Kornevin or Heteroauxin for 10-16 hours and planted in a greenhouse in the evening. 1-2 leaves are left on the green cuttings, this is necessary for photosynthesis processes to occur. If you remove all the leaves, the green cutting will dry out. If the leaves are very large, they are cut in half to reduce water evaporation.
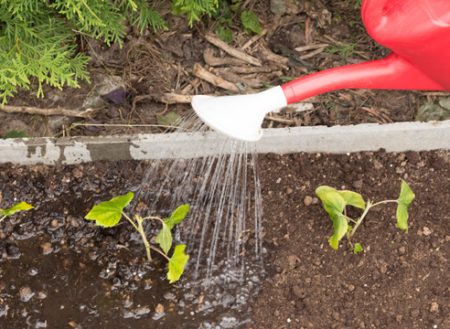
Planting is done at an angle of 45°, burying the 2 lower buds into the ground. The soil is compacted and watered abundantly. The planted planting material is sprayed with water, covered with a cap made of plastic bottles or film and always shaded. The greenhouse must maintain a temperature of 18-23°C and a humidity of more than 90%.
Before rooting, cuttings are regularly sprayed and watered. It is impossible to allow not only drying out, but even drying out of the soil. There should always be moisture on the leaves.
The first roots appear on days 12-15. Rooting occurs in 3.5-4 weeks. An indicator of rooting is the appearance of a shoot from the leaf axil, this is especially typical for black currants. After the first shoot appears, the shading is removed and the cap begins to open for several hours, gradually increasing the time. Humidity and temperature are also gradually reduced.
Caring for currant cuttings.
Watering is reduced to once every 2-3 days, but the soil should not dry out. By the beginning of autumn, young seedlings are fully adapted to environmental conditions. From the greenhouse they are transplanted into open ground and grown for another year, after which they are planted in a permanent place. If the seedlings are large, then they can be planted in a new place directly from the greenhouse.
Reproduction of currants in autumn
In autumn, currants can be propagated by woody cuttings, vertical layering and dividing the bush.
Lignified cuttings are obtained from the current year's growth in early September. The shoots should be mature, with light brown bark. Green shoots are unsuitable for autumn propagation. Planting material is cut and rooted in the same way as in the spring.
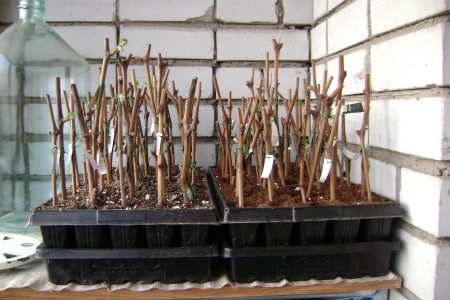
Preparation of lignified cuttings
This material is used for winter and spring rooting of currants. Such cuttings are harvested late in the fall, when the bushes have already stopped growing and the temperature remains at +5-6°C for a long time. The material is taken from lignified 1-2 year old shoots, cuttings containing 5-6 buds are cut. Both the lower and upper cuts are made straight, the lower cut is made 1-1.5 cm away from the bud.
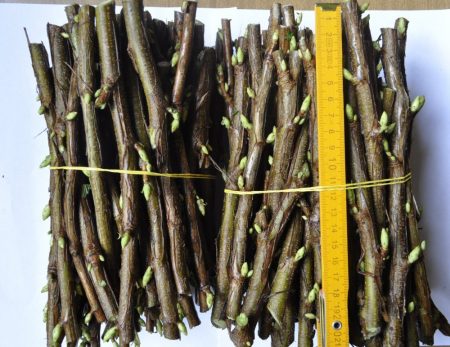
Preparation of currant cuttings.
Sliced cuttings are dipped completely in melted wax, paraffin or garden varnish; you can coat them with plasticine. This is necessary in order to prevent the planting material from drying out due to excess evaporation. In this form, they remain dormant longer and, therefore, remain viable. Planting material is tied into bundles, the variety and date of harvest are signed, and wrapped in cotton fabric or paper. Store in a cold room (cellar, barn, attic) or in the refrigerator at a temperature of +1-3°C. If possible, you can bury them deep in the snow. There is no need to be afraid, the cuttings will not freeze and will remain viable.
Before planting, the cuttings are cleaned of protective material, the lower end is cut into an oblique cut, 1-2 mm away from the bud. In the spring they are planted like ordinary woody cuttings, or used for winter planting.
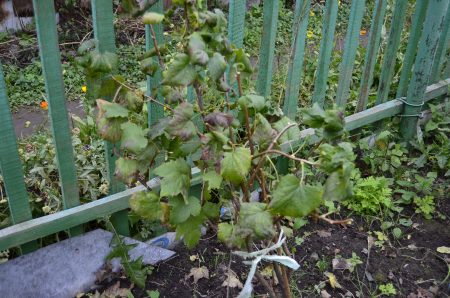
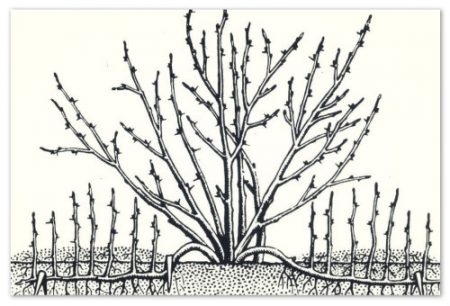
Vertical layering method
This method is used for propagation, health improvement, and rejuvenation of old bushes.
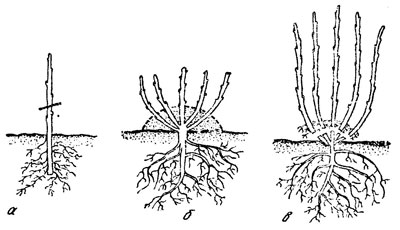
Vertical layers.
In late autumn, when the currant is already at rest, all above-ground shoots are cut off, leaving stumps 3-5 cm high. This upsets the balance between the above-ground and underground parts of the currant. In the spring, after awakening, new shoots will emerge from the roots. When the stems grow to 20-25 cm, they are spudded, sprinkling 1-2 lower buds with soil. As the shoots grow, the currants are earthed up several more times, bringing the height of the resulting earthen mound to 20 cm. Hilling up stimulates the formation of roots from the buds that are underground. The soil under the bushes is kept moist. Watering is carried out 2 times a week; if the weather is hot and dry, then their number is increased to 3. The watering rate is 5 liters per bush. Under no circumstances should the soil dry out, otherwise the roots formed from the buds sprinkled with soil will dry out.
In the fall, the bush is unplanted, young shoots are separated from the mother bush and immediately planted in a permanent place.
This method of propagation produces very strong, healthy seedlings. The disadvantage of this method is the lack of berries in the next 2 years, since the old bush is no longer there, and the young ones will begin to bear fruit only after a year.
This method can also be used in the spring. Currants are cut out as soon as the snow melts, before the growing season begins, otherwise the bush will die.
Propagation of currants by dividing bushes
This is the most irrational method of propagation, because if it fails, you can lose a bush or even a variety. The bush is divided in the fall, at other times it can be divided only in emergency cases, when the above-ground part dies, and it is desirable to preserve the variety at any cost.In autumn, the survival rate of the separated parts is much better. The exchange of substances between the roots and the crown is not as intense as in spring and summer; the outflow of plastic substances occurs from the shoots to the roots. Therefore, in the fall, roots recover faster and easier from damage.
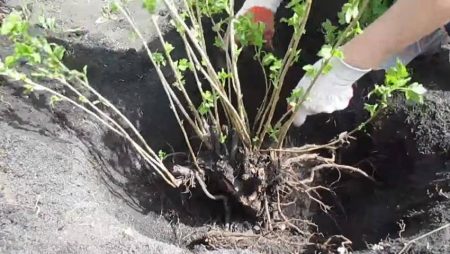
Dividing a currant bush in the fall.
Red and white currants take root faster and easier after dividing the bushes than black ones. The survival rate for red and white currants is 75-85%, for black currants - 50-70%.
The division of bushes is carried out at the end of October, about a month before the end of the growing season. The bush is dug to a depth of 15-25 cm, rocked and removed from the ground, the roots that interfere with the digging are cut off. The dug up currants are divided into several parts, cutting the roots with a shovel, so that each of them contains at least 2-3 zero shoots, but no more than 5. Each part must have well-developed roots. All leaves of separated shoots must be removed.
Before planting, the separated parts are dipped in a heteroauxin solution for 15-20 minutes, then planted in a permanent place. When planting, the roots are carefully straightened; they should not bend or twist. Divided bushes are planted obliquely, burying 2-3 buds 4-6 cm into the ground. After planting, new bushes must be well watered, and all shoots are shortened by 2/3. Watering is carried out every 2-3 days; the soil should never dry out. 3 days after planting, the bushes are watered with a solution of Heteroauxin or Kornevin. The consumption rate is 5-10 liters per bush.
The rooting of new plants can be judged by the slight swelling of the buds. But most often it is possible to understand whether the divided bushes have taken root or not only in the spring.
Growing planting material in winter
In winter, lignified cuttings prepared in the fall are rooted. All types of currants reproduce well in this way. The method is good, but too troublesome; in winter there is barely enough time to grow seedlings of vegetables and flowers. However, very good strong seedlings grow from winter cuttings.
The planting material prepared in the fall is heated for 6-7 hours at room temperature, then placed in water and placed in a bright place, but protected from direct sunlight. After 10-12 days, roots begin to form on the cuttings. When the largest root reaches a length of 1.2-1.5 mm, the planting material is transplanted into bags (can be planted in pots, but when transplanting from a bag, the currant roots are less damaged than when transplanting from a pot), after making holes for water drainage.
The soil for planting should be ordinary garden soil, but in no case nutritious soil (currants cannot tolerate high concentrations of salts), otherwise the rooting process will be greatly delayed. Plant without burying the lower buds; they should remain above the surface of the ground. The main thing at this time is not the growth of side shoots, but rooting. The seedlings are not covered with anything. In the first 5-7 days, water once every 2 days, the soil should be the consistency of dough. After a week, watering is reduced, bringing the soil moisture to normal, and watered as the earthen clod dries out. The seedlings are planted in early May, by which time they will have grown to 50-60 cm. The bags are cut before planting so as not to injure the roots. If currants grow in pots, then fill it with water and carefully remove the bush. The rooted cuttings are planted immediately in a permanent place. Planting is done obliquely, deepening the seedlings by 10-12 cm. Further care is the same as for adult bushes.
How to propagate currants by seeds
Seed propagation is completely unsuitable for amateur gardening. Currants came into garden culture from the forest, and the seeds retain all the characteristics of their wild ancestor. When grown from seeds, the progeny exhibits a strong breakdown of traits towards deterioration, and varietal qualities are not preserved.
If you want to grow currants from seeds, then keep the berries on the bushes until they are completely ripe. When they are fully ripe, they are removed, the seeds are selected, lightly dried for 1-2 days and sown immediately. You can sow in boxes or in a garden bed. Sow in furrows that are previously shed with water. The crops are covered with earth and lightly compacted. No special soil is required for sowing currant seeds.
The boxes or bed are covered with film. Shoots appear in 20-40 days. The germination time for different varieties of currants is different. As soon as the shoots appear, the film is removed. When the seedlings reach a height of 10-15 cm, they are plucked from the pots into a garden bed (a school of seedlings), where they are left to overwinter.
Seedlings grown in the garden do not need to be picked. For the winter, they are mulched with peat, straw, sawdust, or simply sprinkled with earth. In the spring of next year, the seedlings are thinned out, leaving only healthy, strong plants. In the school they are grown until the first harvest is obtained. Then they select for the taste and large-fruited bushes. The best ones are selected, the rest are removed.


 (3 ratings, average: 3,33 out of 5)
 CUCUMBERS NEVER GET SICK, I'VE BEEN USING ONLY THIS FOR 40 YEARS! I SHARE A SECRET WITH YOU, CUCUMBERS ARE LIKE THE PICTURE!
 You can dig a bucket of potatoes from each bush. Do you think these are fairy tales? Watch the video
 How our fellow gardeners work in Korea. There is a lot to learn and just fun to watch.
 Eye trainer. The author claims that with daily viewing, vision is restored. They don't charge money for views.
 A 3-ingredient cake recipe in 30 minutes is better than Napoleon. Simple and very tasty.
 Therapeutic exercises for cervical osteochondrosis. A complete set of exercises.
 Which indoor plants match your zodiac sign?
 What about them? Excursion to German dachas.