Rooting hydrangea cuttings
| Content:
|
Hydrangea, striking with the luxurious beauty of its lush bushes and the sophistication of its inflorescences, is a constant favorite in gardens and summer cottages. This genus of ornamental plants has several species, each of which has its own distinctive features, a variety of inflorescence shapes and flowering shades.
Any amateur gardener or collector will never have enough hydrangeas. The plant is successfully propagated in several ways, the simplest of which is cuttings.
|
Propagation by cuttings is suitable for all types of hydrangea and guarantees a successful result without much hassle. Having mastered the procedure, you can increase your favorite plant varieties and enrich your garden with new specimens. |
Cuttings of hydrangeas
Propagating hydrangeas by cuttings has a number of advantages over other methods of propagating ornamental crops:
- Ease of implementation. It does not require special tools, skills, or knowledge; anyone can master the procedure.
- Cuttings allow you to preserve all the varietal characteristics of the plant.
- Availability of available planting material. The shoots remaining after pruning the bush can be used for successful propagation of hydrangea.
All types and varieties of hydrangea tolerate the cutting procedure well. The planting material obtained from the mother bush quickly takes root and grows. Hydrangea is propagated by both green and last year's lignified cuttings.
To achieve optimal rooting, follow basic rules when cutting cuttings:
- Choose a healthy mother plant that is not affected by pests (aphids, spider mites) or diseases.
- In summer, preference is given to stems without flowering buds.
- Cuttings should be cut quickly, in a shaded place, to prevent them from drying out.
- The procedure is carried out with a sharp, disinfected instrument (secateurs).
When propagating ornamental shrubs by cuttings, the root system and stems of the young seedling often do not have time to grow stronger before the onset of frost. Therefore, the timing of the procedure should be taken into account. Garden hydrangeas are taken from cuttings throughout the year. The timing of the operation has its own characteristics that must be taken into account.
When cutting in spring, the type of shrub is taken into account. Tree hydrangea comes to life faster than its relatives; already in March its buds swell (depending on the region of growth). This period is favorable for cutting planting material.
Paniculate hydrangea awakens later than the tree-like representative. It is best propagated by green cuttings cut in the second half of May.
Large-leaved varieties overwinter in frost-free rooms, from which they are removed as early as February. In April, the growing season for plants of this species is in full swing; at this time, planting material is successfully cut, paying attention to the condition of the plant and the climate in the region.
When is the best time to take hydrangea cuttings?
To successfully survive the winter, little green pets need to be given time to develop their root system. The best period for harvesting and rooting cuttings is from spring, when the mother plant comes to life and blooms, until mid-summer, while the leaves are green.
Thus, depending on the region of growth, hydrangea is successfully cut from cuttings in the second half of May, June, and July. During this period, the shoots become quite mature, and an increased content of heteroauxin accumulates in the plant, which has the best effect on root formation.Carrying out the propagation procedure during these months shows a high survival rate of seedlings.
Video about spring cuttings of hydrangea:
Cuttings of hydrangea in spring
Early spring is the time to start propagating hydrangeas.
For reproduction you will need:
- cuttings;
- cups, volume 250 and 330 ml;
- root formation stimulants for successful rooting (“Kornevin”, “Heteroauxin”, “Clonex”, “Fitoklon”). The preparations contain phytohormones, which speed up metabolism and provoke the plant to form roots faster;
- substrate;
- sharp, disinfected pruning shears (scissors, side cutters).
Prepare the soil. The substrate can be any, the main requirement is high breathability. The more air supplied to the cutting, the better the rooting process occurs. The substrate should not be too nutritious. An increased content of fertilizers can lead to the death of weak young roots. Use coconut shavings, sphagnum moss, and non-acidic peat. Before use, the substrate is moistened abundantly.
Important! To make the soil more airy, add vermiculite and agroperlite.
The procedure for spring cuttings of hydrangea is carried out as follows:
- In the bottom of 250 ml cups, drainage holes are made in three places with a hot nail.
- The containers are filled with prepared soil.
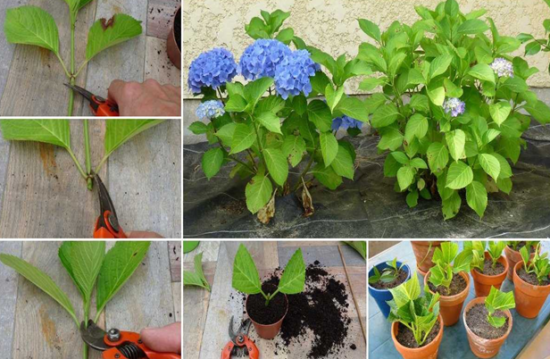
- Planting material is being prepared. Medium shoots, 3-5 mm thick, are selected from the bush and cut off, leaving 2-3 buds from the ground. Thick shoots are not used for cutting seedlings.
- Cuttings are cut from cut branches so that they have at least two internodes. The upper cut is made straight at a distance of 0.5 - 1 cm from the buds, the lower cut is made oblique, for better contact of the seedling with the soil.
- The lower parts of the cuttings are dusted with a powdered root preparation or soaked for 2-4 hours in a liquid solution.
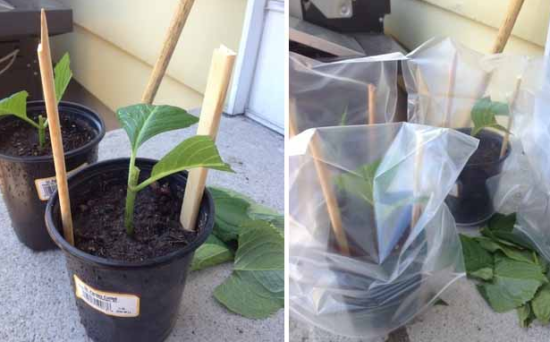
- Insert seedlings into cups with soil up to the upper internode. The bottom node should be in the ground, roots will form from it.
- Cover with 330 ml cups on top, creating mini-greenhouses. Inside, you get a closed space, isolated from the outside world. Due to the evaporation of water from the substrate, the humidity inside the mini-greenhouses will be close to 100%. There is no need to ventilate the plantings; in such conditions, the rooting process goes faster.
It will take 5-6 weeks for the branches to completely root. White threads of roots, visible through the walls of transparent cups and blossoming buds, signal successful rooting.
|
Rooting hydrangea cuttings |
Seedlings are removed from containers and planted in pre-prepared areas. Throughout the season, green pets are provided with proper care: watering, spraying, loosening. With the onset of autumn cold weather, they are covered with spruce branches, leaf litter, and spunbond for the winter.
Root hydrangea cuttings cut in spring into open ground. They are planted on a pre-prepared bed with a light soil mixture, each seedling is covered on top with a plastic bottle without a bottom. After 1-1.5 months, the shelters are removed. The nursery is covered for the winter. In the spring, the shelters are removed, the green pets are cared for throughout the season and the following year they are seated in permanent places.
Features of summer cuttings
The best time to propagate hydrangeas in the summer months is from mid-June to mid-July. The shoots still retained their buds and did not have time to harden.The summer cutting procedure is called propagation by green cuttings.
Important! The root system of summer cuttings tolerates winter frosts worse than spring seedlings.
In the summer season, hydrangeas usually form the base of a bush - a skeleton of three or four branches, the rest are removed. You can combine the formation procedure with the preparation of planting material, using unnecessary shoots for cutting cuttings.
Planting material is cut from young shoots. Thin, weak, twisted shoots growing in the shade should not be used in the middle of the bush; they will not give a good result.
Video about cutting hydrangea with green cuttings:
The procedure for summer cuttings of hydrangeas is as follows:
- Prepare the substrate described above in advance, or use self-prepared soil using the following components:
- sand;
- perlite;
- vermicompost;
- high peat
The soil should be moisture-absorbing, loose, and light.
- The shoots are cut into cuttings with two internodes, making the upper cut straight and the lower cut oblique. The distance from the upper and lower sections to the pair of buds is 1.5 cm. The lower pair of leaves is removed, the upper ones are shortened by half, reducing the area of moisture evaporation.
- Soak the prepared planting material for 2 – 4 hours in a root formation stimulator. You can do without store-bought medications by using a solution of honey or aloe juice: 1 tsp per glass of water. Many gardeners do not soak cuttings; they simply dip the lower cut into a powdered stimulant immediately during planting.
- The containers are filled with soil mixture, the cuttings are planted, deepening to the lower internode. Seedlings are planted frequently; summer cuttings show a low survival rate.
You can also root hydrangea cuttings in open ground, in a pre-prepared bed located in partial shade. You shouldn’t place greens in a greenhouse; it’s too hot there in the summer.
- The container with the planted cuttings is placed in the shade, the planting material is watered and the foliage is sprayed with water daily (morning and evening) from a spray bottle. Leaves cut in half evaporate a lot of moisture. Daily spraying will help the seedlings restore their water balance. In order not to irrigate the plants so often, containers with plantings are covered with bags, without tying them completely, so that the cuttings do not ripen.
|
Cutting and planting hydrangea cuttings in summer |
Hydrangea seedlings are kept in this state until autumn. For the winter, the nursery is mulched, covered, or containers with seedlings are transferred to a frost-free room.
The appearance of new buds from the bottom of the cutting in the spring will serve as a signal of successful survival. Rooted hydrangeas are planted separately in prepared areas.
How to properly cut hydrangea in the fall
For autumn propagation of hydrangeas, lignified cuttings with developed, large buds are used. Such shoots will form a large number of strong roots, are more hardy, and adapt well to new growing conditions. The optimal period for cutting cuttings is the second half of September.
The procedure for autumn cuttings is practically no different from summer propagation of the crop:
- An air- and moisture-permeable nutrient substrate is prepared. Sand, rotted compost, soil from the garden are mixed in equal parts and moistened.
- Fill the pots with soil mixture. You can use any containers that must have drainage holes.
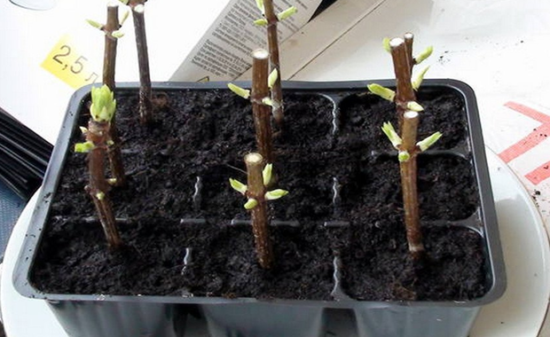
- Cut off from the ground above two internodes the number of stems from the mother bush necessary for cuttings.
- The shoots are cut into pieces similar to the summer method. The lower oblique cut is dusted with a root formation stimulator and inserted into containers up to the upper internode at an angle of 45°C. You can place 2-3 seedlings in one pot.
- Water the plantings with water or a specially prepared solution.
For watering seedlings, the Fitosporin solution has proven itself to be effective (10 grams of dry powder diluted in 5 liters of settled water). The composition can be used 2 hours after dilution. It will help autumn cuttings cope with possible root rot and other fungal and bacterial diseases.
- Pots with seedlings are placed in plastic bags to create a greenhouse effect, tied at the top so that they can be easily untied.
- The containers are taken to a warm room and care is taken that the soil does not dry out and is constantly moist.
- After about a month, when new leaves appear from the leaf axils, the bags are removed.
|
Rooting hydrangea cuttings in autumn |
The seedlings overwinter at home on a warm windowsill. With the onset of spring, seedlings are hardened off before planting in open ground by placing them outside in the shade. When the leaves look vigorous and stop curling after hardening, the plants are planted in a separate bed for growing. This is done with the onset of stable warmth, when the threat of return frosts has passed.
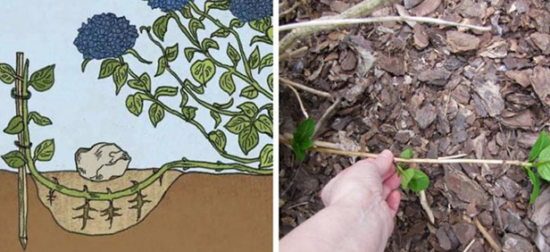
Propagation of hydrangea by layering
Any type of hydrangea can also be successfully propagated by layering, with the exception of large paniculate varieties, which have dense, poorly bending shoots. In this species, young shoots are used as layering.
The procedure is carried out from spring to early autumn:
- From the mother bush, select the outer young branch closest to the ground. The soil underneath is loosened, freed from weeds, making it loose and light.
- On the underside of the shoot, in the place where it will come into contact with the ground, make an oblique cut and insert a sliver. This will speed up rooting.
- Place the shoot in a hole 10-15 cm deep and press it to the ground with staples, pins, or a stone.
- The rooting site is covered with earth, forming a small mound.
- The remaining upper part of the branch is directed vertically upward using a support peg.
- The place of future rooting is periodically watered.
If the layer is buried in the spring, several young shoots should appear on it by the end of August. When they reach a height of 20 cm, the rooting site is hilled up. The procedure is carried out up to three times, until the mound grows to a height of 25 cm. In mid-October, the layering (by this time it will reach a height of about half a meter) is separated from the mother bush, divided into shoots, buried and covered for the winter. In the spring they are planted in the garden, and only a year later in a permanent place.
Layers made in the fall overwinter in natural conditions; it is enough to cover the rooting site with a thick layer of mulch. In mid-summer it is separated from the parent bush and planted separately.
|
Hydrangea propagation by layering |
Helpful information! When buying a young seedling, its lower, small branches are most often cut off, but in vain. They can be successfully used for propagating bushes by layering.
Successfully rooted hydrangea cuttings, regardless of the timing of cuttings, are fed. They do this with the first month of summer.
Azofoska and iron chelate stimulate the growth and rapid development of young seedlings.Azofoska granules are diluted in water according to the instructions and watered each plant, or dropped directly into the pot with the seedling, then moisten the soil.
Hydrangeas are fed with iron chelate both at the leaves and at the roots. In this case, the root system of plants should be well developed. This treatment will not only strengthen the young seedlings, but will also protect them from chlorosis in the future. It is not recommended to fertilize weak plants with this preparation.
The complex fertilizer “Monopotassium phosphate” performed well. It contains a high content of phosphorus, which perfectly stimulates the growth of the root system.
Watch a video about propagating hydrangea by layering:
Similar articles:
- How to properly form a hydrangea on a trunk ⇒
- 5 ways to propagate roses from cuttings ⇒
- Propagation of clematis by cuttings and layering ⇒
- Propagation of adenium by seeds and cuttings ⇒
- All methods of propagation of currants ⇒

 CUCUMBERS NEVER GET SICK, I'VE BEEN USING ONLY THIS FOR 40 YEARS! I SHARE A SECRET WITH YOU, CUCUMBERS ARE LIKE THE PICTURE!
 You can dig a bucket of potatoes from each bush. Do you think these are fairy tales? Watch the video
 How our fellow gardeners work in Korea.There is a lot to learn and just fun to watch.
 Eye trainer. The author claims that with daily viewing, vision is restored. They don't charge money for views.
 A 3-ingredient cake recipe in 30 minutes is better than Napoleon. Simple and very tasty.
 Therapeutic exercises for cervical osteochondrosis. A complete set of exercises.
 Which indoor plants match your zodiac sign?
 What about them? Excursion to German dachas.