Hosta (Hósta) is an unusually beautiful low-growing bush that attracts attention with its large leaves of various colors and shades and modest simple flowers. The spectacular decorative deciduous perennial is called the queen of shady areas for its ability to fully grow and develop even in dense shade.
|
With the help of these herbaceous perennials, you can enliven even the most shady corner of the garden, plant a chic flower garden, or create an unusual plant composition. |
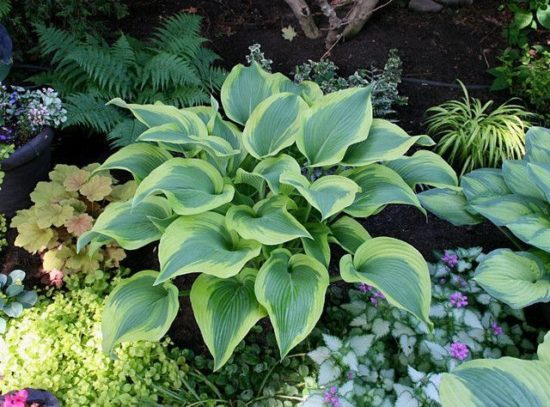
For this quality, as well as their high decorativeness and unpretentiousness in growing, hostas have earned great respect and demand among landscape designers.
| Content:
|
Hosta, or popularly the giant plantain, belongs to the Asparagus family and has about three dozen species and several thousand varieties and hybrids. It has good resistance to high and low temperatures and durability. Planting and caring for hosta in the open ground is within the capabilities of any summer resident.
The height of the bush is from fifteen to eighty centimeters. The culture consists of a compacted rhizome, very wide and beautiful leaf blades collected in a rosette, simple white, pink or bluish bell-shaped fragrant flowers and fruits - boxes with many seeds.
|
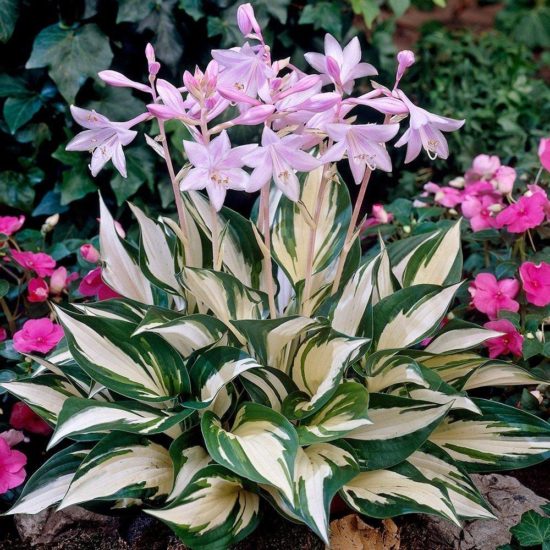
The most important feature and pride of the hosta is its leaves, or rather their shape and color. They can be wide and elongated, rounded and pointed, almost round and heart-shaped. |
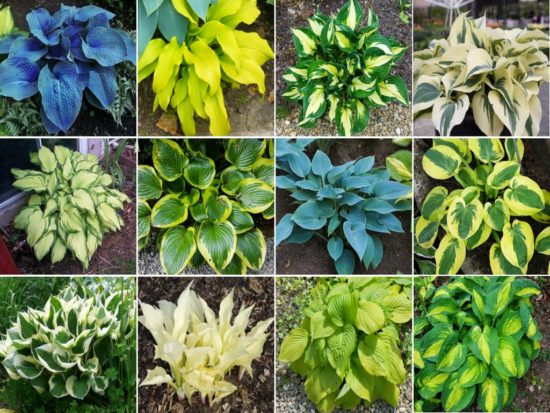
According to the color scheme of the leaves, all varieties are divided into green and blue, yellow and white, variegated, one-color, two-color and three-color. The surface of the abundant foliage with a waxy coating may have a border of different shades and a variety of patterns.
Conditions for successfully growing hosta
To successfully grow an ornamental deciduous stemless plant, it is necessary to properly prepare the seedling and place, determine the period favorable for planting the hosta, create suitable conditions and provide proper care.
Landing dates
The unpretentious hosta can be planted in a permanent place in the spring, at the very beginning or end of summer, or in the fall. The period from the tenth of June to the fifteenth of August, when the weather is very hot, is unsuitable for planting.
- In the spring, from about mid-April to mid-May (depending on the region), crops are planted only in well-warmed soil, when night frosts are no longer a problem. In the Urals, it is recommended to plant hostas in open ground in early June.
- The last days of August or early September are a favorable period for autumn planting. It is very important that the bushes have time to take root and adapt to new conditions before the arrival of real cold weather. This usually takes about one and a half months.
Where is the best place to plant hostas?
When choosing a planting site, you need to focus on the hosta variety.
- For example, plants with white and yellow hues of leaves are best planted in light partial shade, where sunlight will be present for more than five hours a day.
- Varieties with a white border on the leaves require a semi-shaded area where the sun will illuminate the flower garden only in the morning and for no more than four hours.
- Blue-blue hostas prefer shady areas with two to three hours of sun per day (and better in the afternoon).
- Variegated varieties thrive in full sun in the morning and evening and in dense shade during the midday.
|
You can choose for planting trunk circles of tall shrubs or mature trees with a wide crown. |

It is important that crops are protected not only from direct sunlight, but also from strong piercing winds.
It is worth approaching the choice of planting site very responsibly, since hostas can survive in one area without transplanting for about two decades.
Soil preparation
Soil preparation begins in advance, since hostas need fertile and nutritious soil. For example, for spring planting, the soil is prepared in the fall. The entire area is cleared of plant remains and debris, then covered with a ten-centimeter layer of organic matter (compost or rotted humus) at the rate of one and a half buckets for each meter of the area, and deep digging is carried out using a spade. In spring, the area is leveled and loosened using a rake.
Reference! Clay soils are diluted with coarse sand and low-lying peat, and sandy soils with peat and leaf soil, about one and a half to two buckets per meter of area.
Preparing hosta rhizomes for planting
The preparation of planting material begins with a careful examination of the rhizome, after which the following actions are carried out:
- dead, rotten areas of roots, places with traces of mold are cut off with a sharp, disinfected instrument;
- All elongated roots must be pruned;
- all cut areas are sprinkled with ash, activated carbon powder or treated with any fungicide;
- overdried and slightly wilted roots are soaked in a growth stimulator (for example, in a solution of “Epin” or “Zircon”);
- even if no pruning has been carried out, it is recommended to soak the rhizome in a disinfectant solution (for example, based on Fitosporin or manganese) before planting.
Planting hostas in open ground in spring
- The distance between planting holes depends on the selected variety and ranges from twenty to one hundred centimeters.
- A couple of hours before planting, the holes are watered generously with water, and then a drainage layer of broken brick or other material is laid.
- If the site and soil were not prepared in the fall, then it is recommended to pour a mound (about one third) of a nutrient mixture of equal proportions of peat and humus into each hole, and, in a clayey area, also coarse river sand.
- The seedling is placed in the center of the mound, the roots are straightened, and sprinkled with soil so that the growth buds remain at the level of the soil surface.
- The soil is lightly compacted with your hands so that there are no voids left between the roots, and then watered again.
- Immediately after planting, mulch five to seven centimeters thick from crushed bark or peat is applied around each bush.
Hosta care
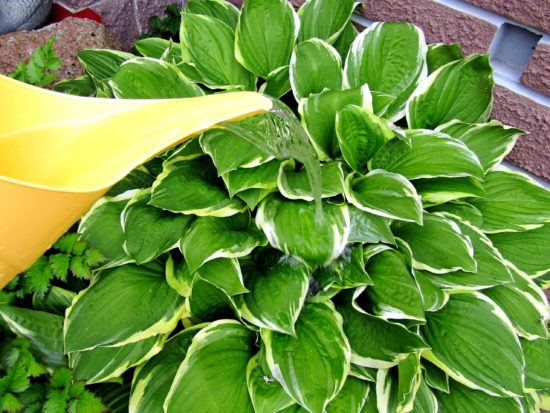
- Water the hosts two to three times a week, and daily during dry periods. A favorable time for watering is the evening after sunset. The soil should remain moderately moist at all times. A mulch layer helps with this, as it prevents the rapid evaporation of moisture. In its absence, it is necessary to ensure that a crust does not form on the soil surface.
- Fertilizing in a fertile area is not necessary in the first two to three years. In the future, fertilizers must be applied three times - mineral complexes in early spring, potassium and phosphorus before flowering, rotted humus after flowering.
- Plants will need weeding and loosening, especially in the first weeks after planting. When the bush grows and the foliage becomes lush, weeds will no longer bother the hosta.You need to loosen the soil after each watering (in the absence of mulch).
- Pruning should be done regularly. To maintain decorativeness, it is necessary to promptly remove faded flowers with peduncles and yellowed leaf plates.
- Preparation for winter helps young crops survive the cold, especially in the first year after planting. Shelters are constructed from a thick layer of fallen leaves and spruce branches. In northern regions with severe frosts, it is worth covering all bushes with mulch and agrofibre.
Planting and caring for hosta in the fall
For autumn planting, it is necessary to choose high-quality planting material with strong, healthy and well-developed roots (at least ten centimeters in length), with two to three growth buds. Its adaptation to a new place and ability to survive the winter will depend on the condition of the seedling.
The depth of the planting hole is thirty to forty centimeters, it all depends on the volume of the root part. The bottom is covered with a layer of crushed stone, broken red brick or other drainage material. You can add a small amount of nutrient substrate with potassium and phosphorus.
|
The distance between seedlings of low-growing and dwarf varieties is from twenty to thirty centimeters, the rest are planted at a distance of fifty to one hundred centimeters from each other. |
The seedlings are placed in the center of the hole, each root is straightened, and all voids are carefully filled with soil, fifty percent consisting of coarse sand and rotted leaves. The root collar is not buried. The bushes are watered abundantly and a mulch layer is applied.
Caring for plants in open ground involves timely and regular watering; the ground should always remain slightly moist.As the air temperature decreases, the frequency and volume of watering is gradually reduced, and then watering is stopped completely.
For the winter, hostas are mulched with peat, fallen leaves or sawdust.
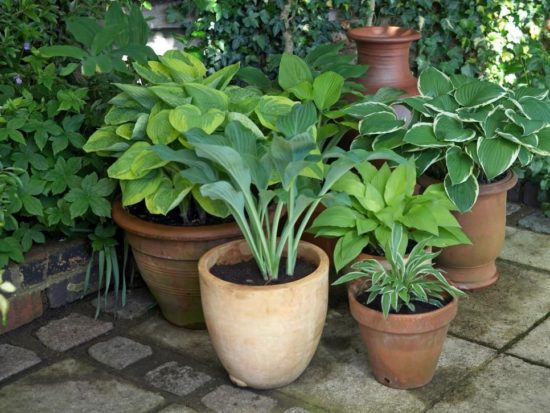
How to properly plant and care for hostas in pots
First you need to choose the right variety, because not all varieties can grow in pots or flowerpots indoors. The best option would be small specimens with a height of ten to forty centimeters.
|
Planting a hosta in a pot or container is not much different from ordinary planting a seedling. |
- The planting container should be small in size, with drainage holes at the bottom and a tray. As the plant grows, it will have to be transplanted into a larger pot.
- Drainage is poured into the bottom of the pot, then a special soil mixture (neutral or low acidity) intended for decorative foliage crops is watered until half of it is watered.
- Place a seedling in the center of the pot, sprinkle it with soil, lightly pressing it with your fingers, and water it. When planting a division (after dividing the bush), all dried and broken roots are first removed.
For full growth and development, the conditions of the planted plant are very important. The flower container must be placed away from direct sunlight, but with sufficient light. The growing area should be slightly shaded, but not dark.
During the warm period, crops are located outdoors - in the garden, on a personal plot, on an open veranda or balcony. With the arrival of autumn cold, the plants are transferred to a dry and cool room.
It is necessary to protect hosts from drafts, especially in the first year after planting.
How to Care for Container Hosts
Like all plants, indoor or garden, hostas require some care. It involves watering, fertilizing, replanting, and pruning.
- Each subsequent watering is carried out only after the top layer of soil has slightly dried. In spring and summer, crops are watered approximately three to four times a week, and in autumn and winter – once or twice a month.

For irrigation, it is recommended to use only water that has been standing for 24 hours or passed through a filter.
- For spring and autumn feeding, special ready-made nutritional supplements with microelements are used to stimulate active growth and flowering. The amount of fertilizer is calculated according to the instructions on the package.
- To maintain a beautiful shape and decorative effect, it is necessary to remove flower stalks in a timely manner. In winter, hosta leaves may dry out. They also need to be pruned.
- As the crops mature, they are transplanted into larger containers. Usually the first transplant is carried out no earlier than one and a half to two years after planting.
- In early spring, flower pots should be taken outside during the day and taken into the room at night. When real warm weather sets in, then hosts can be outdoors 24/7.
Hosta transplant
Hostas thrive in the same area for about twenty years or more. But there are times when plants still need to be transplanted to another place. For example, when the bush has grown too much and densely or over time it became clear that the wrong place for planting was chosen. When there is a redevelopment of the garden area or a move to a new place of residence.
|
Hosta can be replanted in autumn and spring. |
- The ideal time for autumn transplantation is the first half of September.The bush is watered an hour or two before the procedure, removed from the soil, shaken off the soil from the roots and immediately planted in a new flower bed. Long exposure to air is harmful for the root part. If the root grows strongly, it can be divided into parts. After planting, all leaves are cut off. This will help the plant devote all its strength to rooting.
- The spring procedure is similar to the previous one. After removing the bush from the ground, you should carefully examine the roots and remove dry and diseased parts. After removal, the cut sites are sprinkled with ash or poured with potassium permanganate and planted.
Hosta propagation
The seed propagation method is more troublesome and painstaking, requiring a lot of time and attention to the plants.
When dividing the rhizome, the propagation efficiency is much higher, the plants retain all their varietal characteristics, so this method is more popular and widespread among lovers of plant crops.
Planting by seeds
- Seeds are collected when the seed capsule turns brown and opens. After harvesting, it is recommended to keep them in dry, cool conditions, and place them in the refrigerator a month to a month and a half before sowing. You can purchase seed material in specialized stores.
- At the end of March or in the first week of April, the seed is soaked for several hours in a growth stimulator.
- A purchased substrate or one prepared at home (from peat and perlite) is poured into the planting box and moistened.
- Seeds are scattered over a damp surface and crushed with a thin layer of dry soil, covered with a transparent polyethylene covering and the container is placed in a warm room for germination.
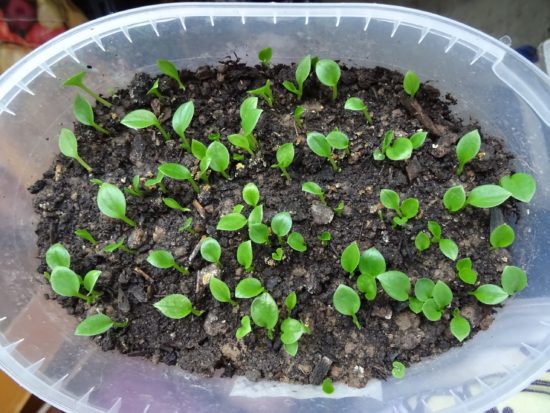
After about fifteen to twenty days, the first seedlings appear, the cover is removed, and the planting box is moved to a place with good lighting.
- Picking into separate small pots is carried out after the appearance of the second leaf. Saplings are planted in light soil with the addition of a small amount of sand. The crops are kept in a mini greenhouse for two weeks.
- It is recommended to moisten the soil through a tray (watering from below).
- After removing the cover, hardening procedures begin. Young cultures are taken out for a walk in the open air, gradually increasing its duration from two to three hours to a round-the-clock stay.
- In the fall, the strengthened seedlings are transferred to open ground, to a permanent growing site.
Reproduction by division of rhizomes
|
The division of rhizomes must be done in early autumn. |
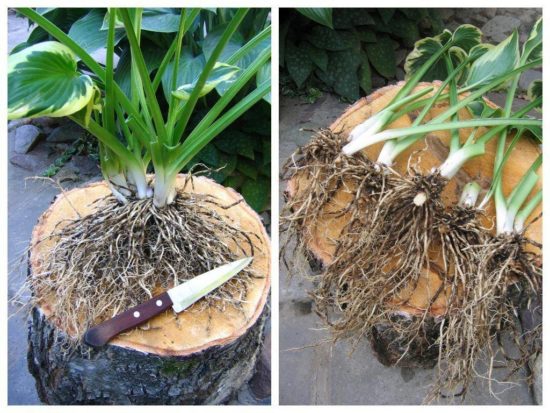
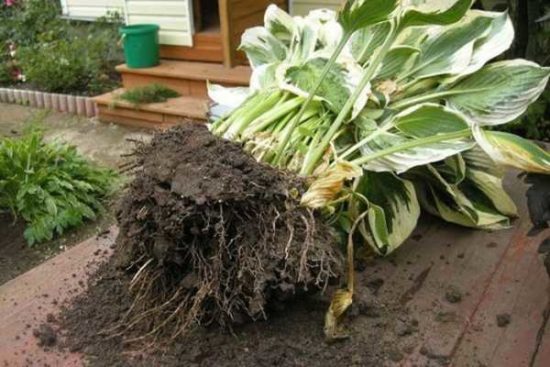
- Water the bush abundantly and carefully dig it out.
- The root part can be washed under running water, after which the roots are inspected. Roots that are unsuitable for further development (dry, broken off, rotten) are removed.
- Using a disinfected sharp knife, the rhizome is divided into parts so that two or three sprouts and at least three leaves remain on each of them. You can separate only one part from the rhizome so as not to injure the entire root system.
- The cut areas are sprinkled with activated carbon powder or wood ash.
- The resulting seedlings are planted without delay at the same depth at which they were, but only necessarily in a different area. They will take much longer to take root in the old place.
Diseases and pests
Hosta is one of the ornamental plants that is highly resistant to pests and various diseases, but in rare cases such problems overtake it too.There may be several reasons for this: violation of the rules of watering and fertilizing, freezing of plants during the cold period, inappropriate living conditions, climate and weather, infections brought from other crops.
At the first signs of fungal diseases (for example, yellow-brown spots, white mold), it is recommended to get rid of the infected bush and disinfect the growing area. Gray mold can be destroyed by treating with fungicides.
The most dangerous pests of hostas are slugs. They leave huge holes on the surface of the leaves, which over time leads to the drying out of the entire bush. As a preventive measure, after planting, a generous mulch layer of broken shells or nut shells, crushed stone or spruce needles is applied around the plants. Pests will not be able to move on such a rough and dry surface.
When caterpillars, grasshoppers and beetles appear, insecticides must be used.
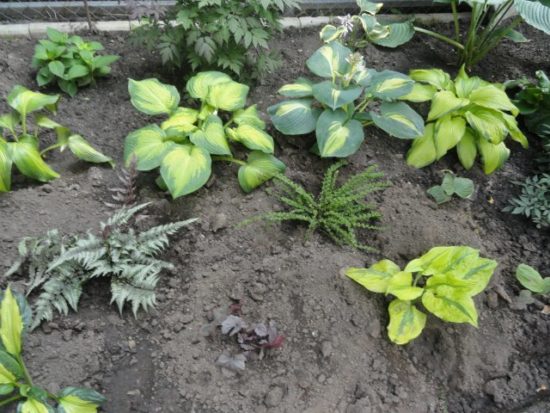
Hosta in garden design
Hostas are universal crops that fit harmoniously into almost every garden style. Tall varieties are planted as tapeworms; low specimens go well with the different shades of foliage of several hosta species and other decorative foliage representatives of the flora.
|
Hostas are appropriate in rocky flower beds and mixborders. |
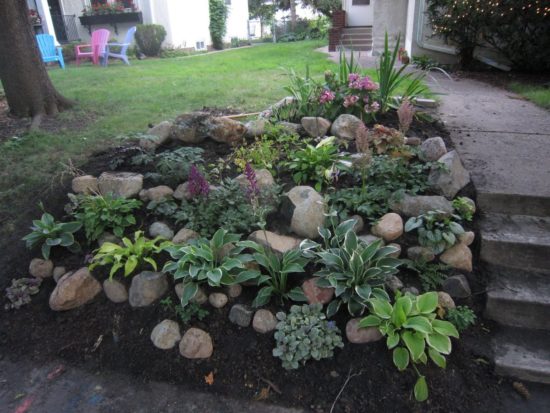
Plants look great and easily take root not only in shady corners of the garden, but also in an alpine hill, near an artificial pond or stream, along the edge of a lawn or near a gazebo.
|
The most inconspicuous corner comes to life and is transformed, coziness, comfort and positive energy appear. |

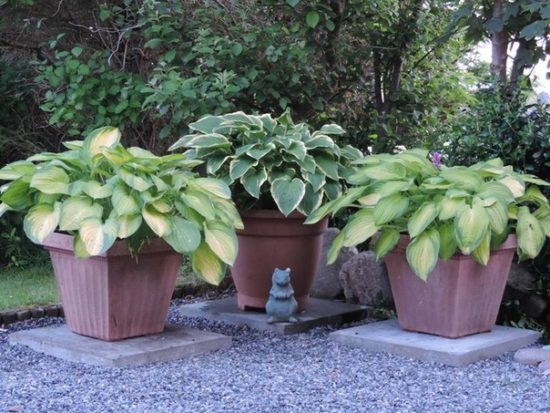
Any area can be decorated with flowerpots and pots with hosta.
|
This method of growing allows you to change the arrangement of plants according to your mood or need. |
The unpretentiousness of the perennial and the easy care of hosta in the open ground, its individuality and variety of varieties are a reason to enliven an inconspicuous area in the garden with colorful and attractive greenery for many years.

 CUCUMBERS NEVER GET SICK, I'VE BEEN USING ONLY THIS FOR 40 YEARS! I SHARE A SECRET WITH YOU, CUCUMBERS ARE LIKE THE PICTURE!
 You can dig a bucket of potatoes from each bush. Do you think these are fairy tales? Watch the video
 How our fellow gardeners work in Korea. There is a lot to learn and just fun to watch.
 Eye trainer. The author claims that with daily viewing, vision is restored. They don't charge money for views.
 A 3-ingredient cake recipe in 30 minutes is better than Napoleon. Simple and very tasty.
 Therapeutic exercises for cervical osteochondrosis. A complete set of exercises.
 Which indoor plants match your zodiac sign?
 What about them? Excursion to German dachas.
Propagation by seeds should begin in April or May. Pour drainage into containers, then soil mixture, water it. Spread the seeds, sprinkle them with soil on top (layer thickness - 5-7 mm). Lightly crush it, cover the container with glass or film and place it in a shady place. Hosta germination temperature – +18-25? C. In such conditions, seedlings appear in 2-3 weeks.
Hello, thanks for the article!
The best article I've read. Everything about hosta is here. Thank you.