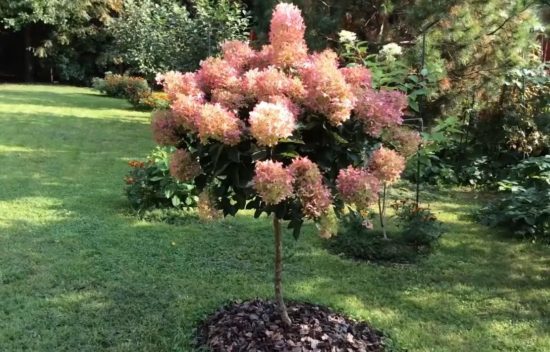
Do-it-yourself hydrangea on a trunk
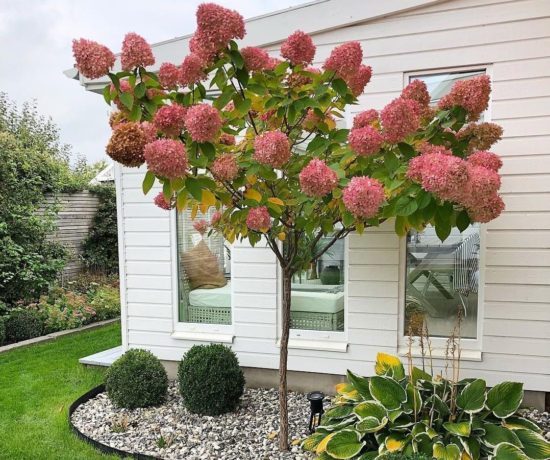
A powerful shrub with heavy heads of flowers, paniculata hydrangea has virtually no competitors in the beauty of its flowering. Lush bushes up to 2 meters high, with inflorescences of various colors and shades, are used to decorate the garden and local area.
The plant looks most advantageous in the form of a standard tree. Its central trunk is from 35 to 150 cm high.and the crown branching from above attracts everyone's attention during flowering.
| Content:
|
|
Growing standard hydrangea on your own plot is not at all difficult, but you will have to be patient, this is not a matter of one year. |
Methods for growing standard paniculate hydrangea
There are two options for obtaining paniculata hydrangea on a trunk:
1. Trimming and shaping
The easiest way to force a trunk. Allows you to get a strong central trunk, and in the future a full-fledged tree from an adult, developed paniculate hydrangea bush with a powerful root system.
If a hydrangea bush has been growing in the garden for several years, it will be an excellent specimen for forming a trunk. If it is not available, you can purchase a young plant from a nursery and plant it on the site. When the seedling has grown sufficiently, gained strength and acquired a powerful root system, you can begin pruning and forming a trunk and crown. A hydrangea tree from the stem of such a bush will have its own roots, which will make caring for your pet easier in the future.
|
Formation of a hydrangea tree |
2. Vaccination
A more complex and time-consuming method can be done by experienced gardeners. The procedure will require a rootstock and scion.
- The rootstock is the lower part of a mature, healthy plant, related to hydrangea. Typically, a well-ripened, thick, strong hydrangea stem is used.
- The scion is a cutting of Hydrangea paniculata of the desired variety.
Planting a seedling for subsequent formation of a trunk
Planting is carried out both in spring and autumn.The plant prefers loose, nutritious, slightly acidic soil with a high moisture content.
Hydrangeas feel good both in open, sunny places and in partial shade. A plant living in the shade will not delight you with gorgeous flowering. It will be depressed and produce weak flower stalks.
Planting is carried out observing the following agrotechnical practices:
- Preparing the planting hole. The root system of hydrangea paniculata is superficial, the bulk of the roots are located in the upper 30 cm of the soil. You should not dig a deep pit, it is better to make a wide hole with an area of 80 cm, and a depth of a shovel bayonet;
- Refilling the planting pit. The plant prefers soil with a moderately acidic reaction (5.5-6.5 Ph). Depending on the available source soil (can be sandy, clay, etc.), the soil mixture is prepared in a ratio of 1: 1: 1: 1 part of the original soil, 1 part of humus, 1 part of additives (peat, sand, compost, pine litter ). To retain moisture, expanded clay can be added to the soil mixture.
- Planting a seedling. The planting depth is not critical; you can plant it at a level with the existing earthen ball of the purchased plant, or you can deepen it. At the same time, adventitious roots will begin to form, they will serve as a source of additional nutrition for the baby. Having placed the seedling in the center of the hole, straighten the roots, sprinkle with fertile soil, and tamp lightly. Rolls of earth are made around the planted bush, forming a circle around the trunk. It will prevent water from spreading when watering;
- Watering. Hydrangea paniculata is a moisture-loving bush. After planting, moisten the soil to a depth of 20 cm. To prevent the formation of crust and retain moisture, the tree trunk circle is mulched with mown grass, hay, straw, and bark.
|
Hydrangea on three trunks |
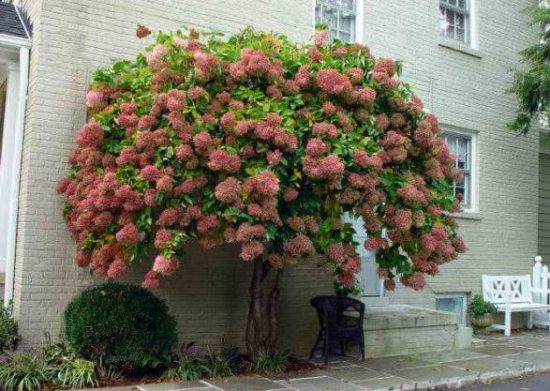
To make the tree more stable, to distribute the load on the central rod, it makes sense to form the plant into 2-3 trunks with one crown.
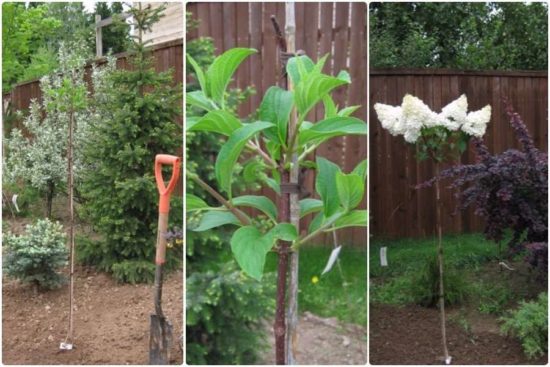
Forming a standard hydrangea using pruning. (Basic method)
Attractive in its ease of execution, it will be suitable for beginners in gardening. It consists of pruning an existing hydrangea paniculata bush that has been growing on the site for a long time, or a purchased seedling from a nursery planted and grown specifically for this purpose.
- In autumn, a powerful hydrangea bush with a well-developed root system leaves a strong, even shoot growing from the base. The remaining stems are removed;
- On the lower part of the future trunk there are buds. They need to be woken up. Having retreated two internodes from below, cut off the stem just above the growth of the eyes. In spring, hydrangea will sprout new branches from them;
- If two or three shoots have grown, you need to leave one and remove the rest. All food will go to the chosen one, he will quickly grow;
- To ensure that the future trunk grows vertically, a high support peg is installed nearby. As it grows, the stem is tightly tied to it in several places using the figure eight method;

Using pruning, you can form a hydrangea tree like this
- During the season, the shoot grows 1.70 - 1.80 cm in length. In the fall, having chosen the desired height of the future tree, the excess upper part is cut off;
- Next year, at the crown just below the cut, new shoots will begin to appear, they will form the top of the trunk;
- All leaves on the main stem are removed so that all nutrition goes directly to the crown of the tree. As it grows, new shoots and leaves that appear on the central conductor in the internodes are constantly torn off; the trunk must remain completely bare.Shoots should grow only from the top 3-4 buds.
This video very clearly shows an even simpler way of forming paniculate hydrangea on a trunk. Be sure to check it out.
How to make standard hydrangea using grafting
The procedure is not for everyone and is not always successful the first time. However, it should be adopted as the fastest way to get paniculate hydrangea in the form of a tree.
|
Grafting a cutting onto a standard |
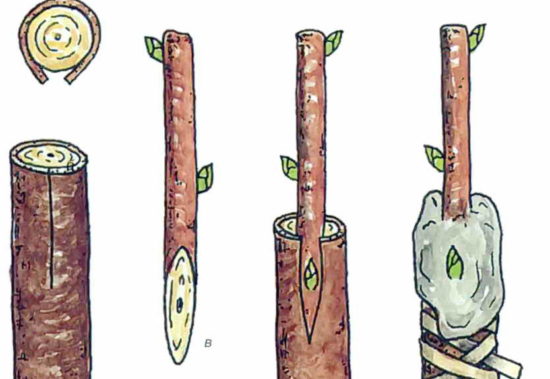
- Rootstock selection. A healthy, strong hydrangea trunk with a developed root system is best suited;
- The scion is used as cuttings cut from a bush of the variety that needs to be grown on a trunk. It is advisable to plant those types of hydrangea that hold their inflorescences well. Otherwise, at the slightest wind or rain, branches with powerful peduncles will hang unattractively. Cuttings must be freshly cut and have 2-3 live eyes. The lower cut is made at an angle of 45°, so it is more convenient to implant the cutting into the rootstock. The upper cut is made straight, just above the second or third bud and treated with garden varnish;
- The rootstock from above is cut to the desired height with a sharp, processed knife. This place will be the beginning of the crown;
- In the upper part of the rootstock, the bark is cut perpendicular to the ground by 2-3 cm. The cutting is inserted into the resulting split with an oblique cut. Press tightly, tie the grafting site with twine and protect with film from precipitation.
To obtain a crown of two or three legs, 2-3 cuttings are grafted onto one rootstock. The awakening of buds on the scions 3 weeks after the procedure will be an indicator of a successful vaccination.
Caring for standard hydrangeas
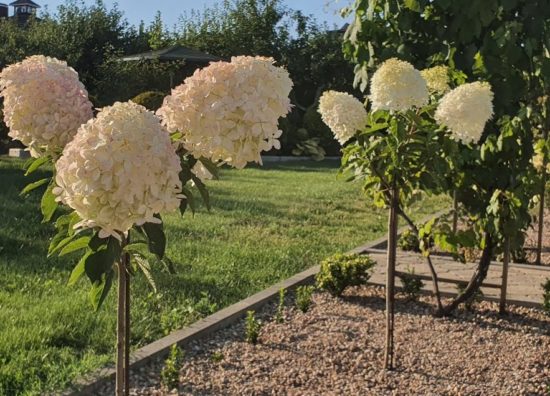
Depending on the chosen variety and care for the pet, after 2-3 years you will receive a ready-made hydrangea tree on a trunk.If there is enough care and attention, the seedling will reward you with a thick crown, a large number of peduncles, rich leaves, brightness and richness of flowers.
- Trimming. Every spring, the growth of the previous year is cut off so that one bud remains, from which new shoots will come. Thus, the crown becomes wider. To obtain beautiful, lush hair, after the buds swell, the shoots forming the crown are cut into 2-3 internodes. If desired, the crown can be made multi-level by performing the following manipulations: one shoot can be cut, leaving 2 internodes, the second - 3 internodes, the third - 2 internodes. Sanitary pruning is carried out annually, removing weak, damaged stems and crowns growing inward into a ring;
With proper care, such a flowering tree will decorate your garden.
- Feeding. In order for the stem to be strong, the stems to be tight and healthy, and the flowering to be abundant and long, the plant must be well fed. When the hydrangea begins to grow (late May, early June), feed it with any nitrogen-containing fertilizer to stimulate growth. The tree is fertilized a second time before flowering with mineral fertilizers: urea, superphosphate and potassium salts. 30 grams are dissolved in one bucket of water. preparations and water at the root. responds well to foliage spraying once every ten days, alternating a solution of magnesium sulfate and boric acid;
- Watering. The tree requires watering. It is imperative to sprinkle on the leaves, especially in the absence of rain, and to prevent the soil in the tree trunk from drying out. To water the plant, 2 buckets of water per week are enough;
- Disease prevention and pest protection. In order to prevent infection by viruses and fungi, treatment is carried out in early spring with the preparations “Topaz”, “Fundazol”, “Skor”. To protect against pests, insecticides “Commander”, “Aktellik”, “Akarin” are used. Much attention is paid to the tree trunk; it should be free of weeds and plant debris, this contributes to the emergence and proliferation of diseases and pests.
Preparing the plant for wintering
Hydrangea paniculata on a trunk is a fairly winter-hardy plant. However, for a more comfortable wintering, it is better to cover the tree to protect the trunk from frost and possible cracking of the bark. It should be borne in mind that the plant does not tolerate stagnant air; it requires ventilation. Therefore, the shelter must have protective functions and at the same time be well ventilated.
|
Under such shelter the plants will safely overwinter. |
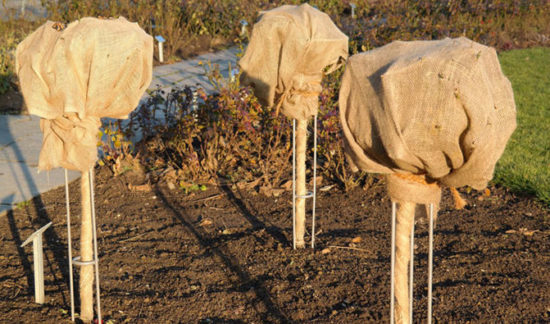
To prevent the roots from freezing, the tree is covered with earth or peat. In severe frost, the lower buds will survive in any case.
The hydrangea is wrapped in a circle and along its entire length with insulating material. The resulting cocoon is secured by wrapping it with rope. A ventilation hole is formed at the top of the shelter, which will prevent the tree from suffocating or overheating. Sprinkle the lower part of the shelter with earth so that cold air does not penetrate to the trunk.

 (2 ratings, average: 4,00 out of 5)
 CUCUMBERS NEVER GET SICK, I'VE BEEN USING ONLY THIS FOR 40 YEARS! I SHARE A SECRET WITH YOU, CUCUMBERS ARE LIKE THE PICTURE!
 You can dig a bucket of potatoes from each bush. Do you think these are fairy tales? Watch the video
 How our fellow gardeners work in Korea. There is a lot to learn and just fun to watch.
 Eye trainer. The author claims that with daily viewing, vision is restored. They don't charge money for views.
 A 3-ingredient cake recipe in 30 minutes is better than Napoleon. Simple and very tasty.
 Therapeutic exercises for cervical osteochondrosis. A complete set of exercises.
 Which indoor plants match your zodiac sign?
 What about them? Excursion to German dachas.